Thursday, December 31, 2009

How to jailbreak ipod touch (itouch) 3.1.2

The itouch I got is the newest one, maybe which is the 3G.
I did all the things in Windows 7.

1. Install itune from the apple official website
2. download blackra1n from:
http://blackra1n.com/
3. connect your itouch to your PC, and open the itune you installed already.
4. open blackra1n.exe


5. Click the "make it ra1n" button.


6. blackra1n will now put your iPod Touch into recovery mode and your itouch will display the following picture of Geohot. While in recovery mode, blackra1n will jailbreak your iPod touch.


7. Once blackra1n finishes jailbreaking, your iPod Touch will reboot and you should see the blackra1n icon as follows on your iPod touch screen.

Friday, December 18, 2009

fix the ikee worm on iphone


One day, I found the background of the lock screen (the background image on the "slide to unlock" screen) was changed by some application.


In fact this is the first worm which infects iphone.
The worm is known as ikee, and it only affects “jail-broken” phones, because a user has removed Apple’s protection mechanisms to allow the phone to run any software.

How to fix:
http://www.austech.info/mobile-phones/29790-quick-fix-iphone-ikee-never-going-give-you-up-ssh-virus.html

P.S.
Firmware 3.0 doesnt have apt-get installed by default when you jailbreak it, so u need to install Aptitude from Cydia.

Thursday, December 17, 2009

Install packages for Kile on Ubuntu

you can install the corresponding texlive packages by Synaptic.

1. Open the Synaptic program (System->Administration->Synaptic)
2. click on search and search for algorithm for algorithm.sty
3. You will find some package contains the style. Choose and install that.

Wednesday, December 16, 2009

install ubuntu 9.10 on Macbook air

Install OS
1. Install rEFIt (this step is optional, you can hold 'Alt' to select partition everytime instead).
2. Use Boot Camp Assistant (it's in Applications/Utilities) to create new partition.
3. Insert the live CD (Ubuntu 9.04) into the drive (no need to be the Apple External Drive) and reboot
4. Hold down ‘C’ button at the black screen to boot from CD.
5. Follow usual Ubuntu installation step. In keyboard selection screen, choose “US-macintosh”
6. In partitioning screen, choose ‘manually edit partition table’.Just create a swap partition and a ext3 partition(Mount it as ‘/’).
7. Complete the installation process. Then reboot.
8. If you install rEFIt, the boot menu will show up. If not, hold 'Alt' button for a while and select the Windows partition for Ubuntu.
9. Upgrade your ubuntu to Ubuntu 9.10

Mac touchpad

in Ubuntu 9.04, the touchpad do not support the right click (two fingers tap),

and after upgrading to 9.10, it can work well.

Wifi
For the first boot of Ubuntu, wifi does not work(can't find any network, but the driver is OK).
And after reboot, it can work well.
Sound
sudo modprobe snd-hda-intel
sudo echo "options snd-hda-intel model=mbp3" >> /etc/modprobe.d/alsa-base.conf
, then restart alsa - i.e
sudo /sbin/alsa force-reload

Then reboot

for your reference:
http://ubuntuforums.org/showthread.php?t=205449


Brightness
The brightness button of macbook air works very slowly in Ubuntu 9.10.
You need to press it for a while to adjust the brightness of your LCD.


I also tried to directly install Ubuntu 9.10 on my macbook air, and I found that there was also no sound and the wireless driver was not installed by default. You can refer to:
http://www.ubuntugeek.com/fix-for-broadcom-4328-v3-wireless-problem-in-ubuntu-9-10-karmic.html
to solve your wireless problem.

The original post I used to solve my wireless problem is as follows:
This tutorial will explain how to fix Broadcom 4328 v3 wireless problem in ubuntu karmic

Try unloading the module (sudo modprobe -r wl) then reload the module (sudo modprobe wl). You should now connect, however it may freeze… the broadcom module is a PITA and I had consistent, yet random system lock ups.

The instructions below will compile the most current version of the bcmwl driver and replace the currently supplied version.

This method has the advantage that in the event there is a update, your newer file will simply be replaced during the upgrade. Keep in mind however that in the event there is a kernel update you will have to repeat the process as the update will overwrite your custom wl.ko.

Also keep in mind that since this a closed source binary “blob” YMMV.

Procedure to follow

First you need to download latest broadcom drivers from:
http://www.broadcom.com/docs/linux_sta/hybrid-portsrc-x86_32-v5.10.91.9.3.tar.gz

Make a directory and extract the files in the archive

mkdir bcmwl

tar xvf ‘hybrid-portsrc-x86_32-v5.10.91.9.3.tar (1).gz’ -C bcmwl

Compile the source

You will need to install the build-essential and kernel headers packages

sudo apt-get install build-essential kernel-header-`uname -r`

To Compile the driver

cd bcmwl

make clean

make

replace the current driver file with the one that you just compiled.

sudo mv ./wl.ko /lib/modules/`uname -r`/updates/dkms/wl.ko

Tuesday, December 15, 2009

How to use skype over 3G on iphone

First, you should jailbreak your iphone, and you can refer to the earlier post in my blog.

Then, open Cydia and tap "Search". Enter "voip", and then you can see "VolPover3G".

Ok, we got it. Install VolPover3G.

If you finish the above steps, you can use your the official skype over 3G on your iphone.

Wednesday, August 19, 2009

use NUS wireless networks on iphone or itouch

In National University of Singapore, NUS, there are two open wireless networks.
One is NUSOPEN and the other is NUS.
The NUS wireless network is better, because you do not need to key in the your NUS net id and password every time.

I'll show you how to configure your iphone, iphone 3G, iphone 3GS, iPod Touch or iPod Touch (2nd Gen) to connect to NUS Wireless network.

If your firmware is 3.0.0, you should follow the following link:
http://lesterchan.net/blog/2008/10/02/configuring-iphoneipod-touch-wlan-for-nus-wireless/

If your firmare is 3.0.1 as my iphone 3G, you can follow the following instructions:
1. go to Settings->Wi-Fi, let the wifi be powered on
2. under the "Choose a Network", click the "Others..."
3. input the "Name" as "NUS", and select the "Security" as "WPA Enterprise", and go back
4. input the "Username" as "nusstu\g1234567", which is your NUS net id, and then input the password
5. finally you can press the "Join" button on the soft keyboard
Note: because the iphone's wifi is weaker than the laptops, sometimes it maybe can't connect to the wireless network. I have used this configuration in central library, and it works well. But when I use it in AS6, it can't connect to the NUS wireless most of the time.

Sunday, August 2, 2009

Unlock iphone 3G with 3.0.1 firmware

1. Jailbreak your iPhone 3G 3.0: use redsn0w

for this step, please refer to:
http://www.quickpwn.com/2009/08/jailbreak-iphone-301.html


2. Go to Cydia and add repo666.ultrasn0w.com to your sources

open your iphone, and select the "Cydia->Manage->Sources->Edit->add"
after you add the repo666.ultrasn0w.com to your sources, you should select "Done"
then press the source "repo666.ultrasn0w.com", and press it again,then select "install", after that "confirm"
finally, after the reboot your iphone is unclocked

how to find iphone MAC address

Settings>General>About

Tuesday, July 14, 2009

Linux Vim 编码 (转载)

原始网址:
http://xwrabit.blog.163.com/blog/static/25675746200861510285091/

和所有的流行文本编辑器一样,Vim 可以很好的编辑各种字符编码的文件,这当然包括UCS-2、UTF-8 等流行的 Unicode 编码方式。然而不幸的是,和很多来自 Linux 世界的软件一样,这需要你自己动手设置。

Vim 有四个跟字符编码方式有关的选项,encoding、fileencoding、fileencodings、termencoding (这些选项可能的取值请参考 Vim 在线帮助 :help encoding-names),它们的意义如下:

* encoding: Vim 内部使用的字符编码方式,包括 Vim 的 buffer (缓冲区)、菜单文本、消息文本等。默认是根据你的locale选择.用户手册上建议只在 .vimrc 中改变它的值,事实上似乎也只有在.vimrc 中改变它的值才有意义。你可以用另外一种编码来编辑和保存文件,如你的vim的encoding为utf-8,所编辑的文件采用cp936编码,vim会自动将读入的文件转成utf-8(vim的能读懂的方式),而当你写入文件时,又会自动转回成cp936(文件的保存编码).

* fileencoding: Vim 中当前编辑的文件的字符编码方式,Vim 保存文件时也会将文件保存为这种字符编码方式 (不管是否新文件都如此)。

* fileencodings: Vim自动探测fileencoding的顺序列表,启动时会按照它所列出的字符编码方式逐一探测即将打开的文件的字符编码方式,并且将 fileencoding 设置为最终探测到的字符编码方式。因此最好将Unicode 编码方式放到这个列表的最前面,将拉丁语系编码方式 latin1 放到最后面。

* termencoding: Vim 所工作的终端 (或者 Windows 的 Console 窗口) 的字符编码方式。如果vim所在的term与vim编码相同,则无需设置。如其不然,你可以用vim的termencoding选项将自动转换成term 的编码.这个选项在 Windows 下对我们常用的 GUI 模式的 gVim 无效,而对 Console 模式的Vim 而言就是 Windows 控制台的代码页,并且通常我们不需要改变它。

好了,解释完了这一堆容易让新手犯糊涂的参数,我们来看看 Vim 的多字符编码方式支持是如何工作的。

1. Vim 启动,根据 .vimrc 中设置的 encoding 的值来设置 buffer、菜单文本、消息文的字符编码方式。

2. 读取需要编辑的文件,根据 fileencodings 中列出的字符编码方式逐一探测该文件编码方式。并设置 fileencoding 为探测到的,看起来是正确的 (注1) 字符编码方式。

3. 对比 fileencoding 和 encoding 的值,若不同则调用 iconv 将文件内容转换为encoding 所描述的字符编码方式,并且把转换后的内容放到为此文件开辟的 buffer 里,此时我们就可以开始编辑这个文件了。注意,完成这一步动作需要调用外部的 iconv.dll(注2),你需要保证这个文件存在于 $VIMRUNTIME 或者其他列在 PATH 环境变量中的目录里。

4. 编辑完成后保存文件时,再次对比 fileencoding 和 encoding 的值。若不同,再次调用 iconv 将即将保存的 buffer 中的文本转换为 fileencoding 所描述的字符编码方式,并保存到指定的文件中。同样,这需要调用 iconv.dll由于 Unicode 能够包含几乎所有的语言的字符,而且 Unicode 的 UTF-8 编码方式又是非常具有性价比的编码方式 (空间消耗比 UCS-2 小),因此建议 encoding 的值设置为utf-8。这么做的另一个理由是 encoding 设置为 utf-8 时,Vim 自动探测文件的编码方式会更准确 (或许这个理由才是主要的 ;)。我们在中文 Windows 里编辑的文件,为了兼顾与其他软件的兼容性,文件编码还是设置为 GB2312/GBK 比较合适,因此 fileencoding 建议设置为 chinese (chinese 是个别名,在 Unix 里表示 gb2312,在 Windows 里表示cp936,也就是 GBK 的代码页)。

以下是我的 .vimrc(见附件) 中关于字符编码方式设置的内容,这个设置比较有弹性,可以根据系统中的环境变量 $LANG (当然,Windows 中的写法是 %LANG%) 的值来自动设置合适的字符编码方式。此时,推荐设置 %LANG% = zh_CN.UTF-8,可以通过后面的 Windows 注册表脚本文件来方便的做到。

注1: 事实上,Vim 的探测准确度并不高,尤其是在 encoding 没有设置为 utf-8 时。因此强烈建议将 encoding 设置为 utf-8,虽然如果你想 Vim 显示中文菜单和提示消息的话这样会带来另一个小问题。

注2: 在 GNU 的 FTP 上可以下载到 iconv 的 Win32 版(http://mirrors.kernel.org/gnu/libiconv/libiconv-1.9.1.bin.woe32.zip),不推荐去GnuWin32(http://gnuwin32.sourceforge.net/) 下载 libiconv,因为那个版本旧一些,并且需要自己改名 dll 文件。

注3: 查看帮助 :h iconv-dynamic

On MS-Windows Vim can be compiled with the |+iconv/dyn| feature. This means Vim will search for the "iconv.dll" and "libiconv.dll" libraries. When neither of them can be found Vim will still work but some conversions won't be possible.

附1:vimrc文件

" Multi-encoding setting, MUST BE IN THE BEGINNING OF .vimrc!

"

if has("multi_byte")

" When 'fileencodings' starts with 'ucs-bom', don't do this manually

"set bomb

set fileencodings=ucs-bom,chinese,taiwan,japan,korea,utf-8,latin1

" CJK environment detection and corresponding setting

if v:lang =~ "^zh_CN"

" Simplified Chinese, on Unix euc-cn, on MS-Windows cp936

set encoding=chinese

set termencoding=chinese

if &fileencoding == ''

set fileencoding=chinese

endif

elseif v:lang =~ "^zh_TW"

" Traditional Chinese, on Unix euc-tw, on MS-Windows cp950

set encoding=taiwan

set termencoding=taiwan

if &fileencoding == ''

set fileencoding=taiwan

endif

elseif v:lang =~ "^ja_JP"

" Japanese, on Unix euc-jp, on MS-Windows cp932

set encoding=japan

set termencoding=japan

if &fileencoding == ''

set fileencoding=japan

endif

elseif v:lang =~ "^ko"

" Korean on Unix euc-kr, on MS-Windows cp949

set encoding=korea

set termencoding=korea

if &fileencoding == ''

set fileencoding=korea

endif

endif

" Detect UTF-8 locale, and override CJK setting if needed

if v:lang =~ "utf8$" || v:lang =~ "UTF-8$"

set encoding=utf-8

endif

else

echoerr 'Sorry, this version of (g)Vim was not compiled with "multi_byte"'

endif

附2:

Supported 'encoding' values are: *encoding-values*

1 latin1 8-bit characters (ISO 8859-1)

1 iso-8859-n ISO_8859 variant (n = 2 to 15)

1 koi8-r Russian

1 koi8-u Ukrainian

1 macroman MacRoman (Macintosh encoding)

1 8bit-{name} any 8-bit encoding (Vim specific name)

1 cp437 similar to iso-8859-1

1 cp737 similar to iso-8859-7

1 cp775 Baltic

1 cp850 similar to iso-8859-4

1 cp852 similar to iso-8859-1

1 cp855 similar to iso-8859-2

1 cp857 similar to iso-8859-5

1 cp860 similar to iso-8859-9

1 cp861 similar to iso-8859-1

1 cp862 similar to iso-8859-1

1 cp863 similar to iso-8859-8

1 cp865 similar to iso-8859-1

1 cp866 similar to iso-8859-5

1 cp869 similar to iso-8859-7

1 cp874 Thai

1 cp1250 Czech, Polish, etc.

1 cp1251 Cyrillic

1 cp1253 Greek

1 cp1254 Turkish

1 cp1255 Hebrew

1 cp1256 Arabic

1 cp1257 Baltic

1 cp1258 Vietnamese

1 cp{number} MS-Windows: any installed single-byte codepage

2 cp932 Japanese (Windows only)

2 euc-jp Japanese (Unix only)

2 sjis Japanese (Unix only)

2 cp949 Korean (Unix and Windows)

2 euc-kr Korean (Unix only)

2 cp936 simplified Chinese (Windows only)

2 euc-cn simplified Chinese (Unix only)

2 cp950 traditional Chinese (on Unix alias for big5)

2 big5 traditional Chinese (on Windows alias for cp950)

2 euc-tw traditional Chinese (Unix only)

2 2byte-{name} Unix: any double-byte encoding (Vim specific name)

2 cp{number} MS-Windows: any installed double-byte codepage

u utf-8 32 bit UTF-8 encoded Unicode (ISO/IEC 10646-1)

u ucs-2 16 bit UCS-2 encoded Unicode (ISO/IEC 10646-1)

u ucs-2le like ucs-2, little endian

u utf-16 ucs-2 extended with double-words for more characters

u utf-16le like utf-16, little endian

u ucs-4 32 bit UCS-4 encoded Unicode (ISO/IEC 10646-1)

u ucs-4le like ucs-4, little endian

The {name} can be any encoding name that your system supports. It is passed

to iconv() to convert between the encoding of the file and the current locale.

For MS-Windows "cp{number}" means using codepage {number}.

Several aliases can be used, they are translated to one of the names above.

An incomplete list:

1 ansi same as latin1 (obsolete, for backward compatibility)

2 japan Japanese: on Unix "euc-jp", on MS-Windows cp932

2 korea Korean: on Unix "euc-kr", on MS-Windows cp949

2 prc simplified Chinese: on Unix "euc-cn", on MS-Windows cp936

2 chinese same as "prc"

2 taiwan traditional Chinese: on Unix "euc-tw", on MS-Windows cp950

u utf8 same as utf-8

u unicode same as ucs-2

u ucs2be same as ucs-2 (big endian)

u ucs-2be same as ucs-2 (big endian)

u ucs-4be same as ucs-4 (big endian)

default stands for the default value of 'encoding', depends on the

environment

Saturday, July 11, 2009

First step of Ubuntu

0. useful tool to find packages of ubuntu
sudo aptitude


1. install some programming language and packages

for C++:
aptitude install g++
aptitude install build-essential
sudo apt-get install zlib1g-dev libssl-dev (for irstlm)

for Java:
sudo apt-get install sun-java6-jdk
and set environment variable
export JAVA_HOME="/usr/lib/jvm/java-6-sun;"
in ~/.bash_profile


2. install flash plugin for firefox
download flash player (.tar.gz for Linux version) from:
http://get.adobe.com/flashplayer/
decompression it, and copy the libflashplayer.so to /usr/lib/firefox-addons/


3. install Flock browser
sudo apt-get install libstdc++5
download Flock from:
http://www.flock.com/download/versions
tar xvf flock-2.5.en-US.linux-i686.tar.bz2
./flock-browser
install flash plugin to Flock:
just like the case of Firefox, copy the libflashplayer.so of flash player to flock/plugins/


4. instal Opera browser
download Opera 10.00b1 for Linux i386 (Download this package in TAR.GZ format) from:
http://www.opera.com/download/?os=linux-i386&ver=10.00b1&local=y
tar -xvzf opera-10.00-b1.gcc4-shared-qt3.i386.tar.gz
cd opera-10.00-4402.gcc4-shared-qt3.i386/

sudo ./install.sh
And then install flash plugin like the firefox case:
copy the libflashplayer.so to /usr/lib/opera/plugins

Tuesday, July 7, 2009

In Java, how to get the OS type and OS name

String osName=null;
// get OS type
try
{
String osType = System.getProperty("os.arch");
System.out.println("Operating system type => " + osType);
osName = System.getProperty("os.name");
System.out.println("Operating system type => " + osName);
}
catch (Exception e)
{
System.out.println("Exception caught =" + e.getMessage());
}

Set Netbeans user Interface language

Netbeans automatically uses the Windows system default language as the default user interface language. I believe that it means to be a nice feature for localization. But I personally find it uncomfortable because I have been used with English interface.

After I did some Google search, I learned a few tips to set the Netbeans UI language.

1. Temporary Solution

Add "--locale en:US" at the end of Netbeans startup command.

"C:\Program Files\NetBeans 6.0.1\bin\netbeans.exe" --locale en:US

2. Permanent Solution

Go to Netbeans installation directory, for example,

C:\Program Files\NetBeans 6.0.1\etc

Open "netbeans.conf" and find netbeans default option line

netbeans_default_options="-J-client -J-Xss2m -J-Xms32m -J-XX:PermSize=32m -J-XX:MaxPermSize=200m -J-Xverify:none -J-Dapple.laf.useScreenMenuBar=true"

Add "-J-Duser.language=en -J-Duser.region=US" to the end of this line

netbeans_default_options="-J-client -J-Xss2m -J-Xms32m -J-XX:PermSize=32m -J-XX:MaxPermSize=200m -J-Xverify:none -J-Dapple.laf.useScreenMenuBar=true -J-Duser.language=en -J-Duser.region=US"


It would be nice that there is an option to allow me choose the user interface language in the next Netbeans release.

In python, how to read unicode or GBK files

import codecs

infile=codecs.open(infilename,"r","gbk")

line=infile.readline()

# all the lines which are read from infile are encoded in GBK

Saturday, July 4, 2009

In Java, how do I set a default character encoding for file I/O operations

The default encoding used by locale/encoding sensitive API in the Java libraries is determined by the System property "file.encoding". This system property is initialized by the JVM startup code after querying the underlying native operating system. For example on my English USA NT box it is initialized to:

Cp1252

It is generally recommended that you do not modify it. However if you know what you are doing you could override the system property either on the command line using the -

java -Dfile.encoding=GBK -jar Speech.jar

syntax or programmatically at startup.

Friday, July 3, 2009

Adding a DOS cmd prompt to the Windows right click menu

1.
Go to the HKEY_CLASSES_ROOT\Folder\shell node in the registry (note that Folder includes drives and directories).

2.
Create a new key (from the right-click menu), and call it "DOS prompt".

3.
Under that new key, create a sub-key named "command".

4.
Under that new key (i.e under HKEY_CLASSES_ROOT\Folder\shell\DOS prompt\command), edit the (Default) String value and give it the following value: "c:\windows\system32\cmd.exe %1" (or whatever the path to cmd.exe is on your system).

5.
Now, you can open a DOS window by right-clicking on any directory name in the Windows explorer.

Wednesday, July 1, 2009

In Java, how to change the encoding of files

These days, I have a task to change the file whose encoding is UTF-8 into a file with encoding of GBK.

I found a very useful tutorial at:
http://www.herongyang.com/unicode/jdk_encoding_conversion.html

As a summary, you can directly use the following Java code:

String cfilename="";
String outCnFileName="";

BufferedReader cfile = new BufferedReader( new InputStreamReader(new FileInputStream(cfilename),"UTF-8") );
BufferedWriter outcnfile = new BufferedWriter( new OutputStreamWriter(new FileOutputStream(outCnFileName),"GBK") );

String line=cfile.readLine();
while( line!=null )
{
outcnfile.write(line+"\n");
}

cfile.close();
outcnfile.close();

Tuesday, June 30, 2009

How to check a file's encoding under Linux

Use the following command:

file $file_name

For example:

$ file cn.txt
cn.txt: UTF-8 Unicode text, with CRLF line terminators

Monday, June 29, 2009

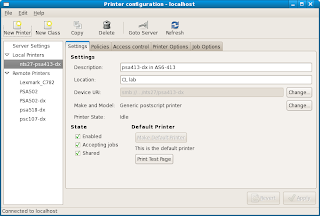
How to add printer to your Fedora in School of Computing of NUS

Open the menu System -> Administration -> Printing


Press the New Printer button


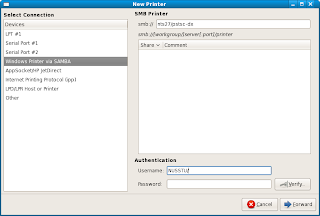
And select "Windows Printer via SAMBA"
Input the smb address "nts27/pstsc-dx" ( if you are a student of SoC and the printer name "pstsc-dx" is the one in Level 1 of COM1)

Then press Forward button


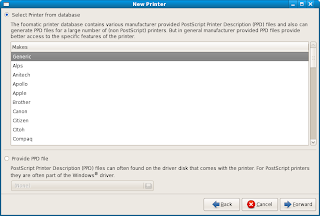
You can directly use the "Generic" and click the Forward button.


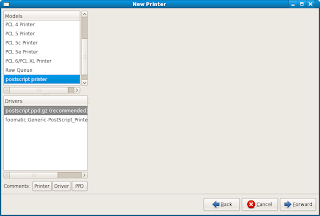
Choose the "postscript printer" and press Forward
And then enter the name displayed on your computer of the printer, and press Forward button.
Click Apply button.

Sunday, June 28, 2009

How to: Install Flock with Adobe Flash Player on Fedora

FWD from:
http://fabdango.net/2009/05/how-to-install-flock-25-with-adobe-flash-player-10-on-fedora-11-leonidas-without-using-the-terminal/
And I add some additional information.


In the following tutorial I’ll show you how to install Flock, the social web browser, and how to enable Adobe Flash player on Fedora 11. The guide is Flock 2.5-Fedora 11-GNOME specific but it should basically work for any Mozilla-based web browser on any Linux distribution using any desktop environment. You can achieve this without even using the terminal or any command line.


1. First, you’ve to get Flock from its official download site. It’s a compressed file (.tar.bz2) containing the full application. It’s enough for running it but it’s not an installer. Save it anywhere you want. You can use the following command to decompress the compressed file:
tar -xjvf flock-2.0.3.en-GB.linux-i686.tar.bz2

2. Once you saved Flock, extract the file where you want the program to be located. I did it at /home/fabian/Software/flock

3. At this very moment you should be able to run Flock just by executing the /flock/flock-browser file, but you won’t have any shotcut to it and won’t be able to show flash content.

4. Next step is to get Adobe Flash Player from its official download page at Adobe.com. Select the .tar.gz file for Linux and save it in your computer. You can use the command as follows to decompress the file:
gzip -d install_flash_player_10_linux.tar.gz
tar -xvf install_flash_player_10_linux.tar

5. Open the file you’ve just download and extract the libflashplayer.so file to /flock/plugins/ for enabling the flash player. It also works if you extract it to /home/user/.flock/plugins

6. The previous step should be enough for making everything work fine, but truth is that Flock will crash. As soon as you load any flash content, the browser will close. This is because the libfreebl3.so library included by Mozilla doesn’t work properly. For solving this, you must go to the folder containing Flock (/folder-you-chose/flock/) and delete the libfreebl3.so file. This will foce the application to use the file included by Fedora, located at /lib/libfreebl3.so, so it won’t crash. This is enough for making Flock play flash content. Next steps will show you how to add nice shortcuts to your desktop.

7. Right flick the Applications menu at the GNOME panel. Select Edit menus. At Aplications -> Internet select New Item. Type: Aplication;
Name: Flock;
Location: /folder-you-chose/flock/flock-browser;
Comment: The social web browser (that’s optional, of course).
About the icon, I suggest this one.
Finally, click OK and you’re done, Flock will be at your applications menu. For creating shortcuts on the GNOME panels or desktop, just drag and drop the entry you’ve just created.

Create a repository in SVN of Linux

You can run the following command:
svnadmin create $repository-name

then the system will create a folder in your current directory named $repository-name.
Suppose the absolute path of the folder created above is,
e.g. /home/yourname/svn/test,
and the URL of the server is,
e.g. www.example.com

You can check out this repository using the command as follows:
svn co svn://www.example.com/home/yourname/svn/test
if you are on the same server, you can use the following command:
svn co file:///home/yourname/svn/test

Using svn + ssh with subclipse in eclipse

1.
get eclipse from:
http://www.eclipse.org/downloads/
(I used "Eclipse IDE for Java Developers (92MB)" of Galileo Packages (based on Eclipse 3.5) )

2.
Run eclipse, and select the menu "Help -> Install New Software"
Add this upgrade site:
http://subclipse.tigris.org/update_1.4.x
You can refer to : http://subclipse.tigris.org/
(You can directly use svn+ssh with subclipse 1.4, because the default JavaHL adapter doesn't support SSH and public key authentication. So we need to use another JavaHL adapter.)

3.
Choose the menu "Eclipse -> Preferences", then go to "Team -> SVN", and find the "SVN Interface" pulldown, and choose "SVNKit(Pure Java) SVNKit v1.2.3.5521" rather than "JavaHL(JNI)1.6.3(r38063)"


Finally, you can use svn+ssh with subclipse of eclipse.

PS: if you use eclipse under Linux, svn+ssh can work well after you install subclipse, that is, no need to configure Step 3 mentioned above.

Saturday, June 27, 2009

Installing Subversion (SVN) plugin for Eclipse

You can install subclipse which contains the SVN plugin:
http://subclipse.tigris.org/


In Eclipse, selecte the Help menu item, then "Install New Software"
Click on the "Available Software Sites" link.
Input "http://subclipse.tigris.org/update_1.6.x"

How to recover your files in eclipse after you delete the files

The eclipse have a version control system, and it can automatically backup some versions of your workspace.
After you delete some important files, you can just right click the project name in the "Package Explorer" and select "Restore from Local History", and you can find the versions before.

Wednesday, May 6, 2009

How to construct your homepage in SoC of NUS

You can easily build your homepage on sunfire of School of Computing (SoC) in National University of Singapore (NUS). Only two steps:

1. in your sunfire home directory, create a new folder named "public_html"
2. change the permission of your home directory and the public_html directory:
chmod o+x
chmod o+x

Now, you can put some html files in the public_html directory, and other people can access your homepage at http://www.comp.nus.edu.sg/~/

Saturday, January 17, 2009

How to only use gmail for a NUS student to deal with emails

1. For NUS email account

1.1 Go to:
https://exchange.nus.edu.sg/
1.2 Then click the "Email Redirection" link, fill your gmail address in the following page. If you want to keep a copy of the email in my NUS mailbox, you may select the "Keep a copy of the email in my original mailbox.".

2. For SoC of NUS email account

2.1 Go to:
https://mysoc.nus.edu.sg/~myacct/mymaildest.cgi
2.2 Then add your gmail address to "My Mail Destinations"

3. Using your gmail account as your other accounts
You can use your gmail to send emails using your other email account name as sender.
This can be found in your gmail's "Settings->Accounts->Send mail as:", and please do select "Reply from the same address to which the message was sent".